In my last post, we used AutoCAD fields and custom sheet set properties to automate title block information. Today, I’m going to demonstrate a way to automate a callout or label by using a little-used but very powerful feature of fields.
I’ll assume you have at least a working knowledge of using AutoCAD fields, so this won’t be a deep dive into them but instead focus on a particular feature. Let’s set up a simple scenario and let your imagination turn it into something you’re familiar with. You have a closed object of some kind in your drawing. Maybe it’s a pool, a pond, or a parking lot… and you have to label its total area in some way. That may be via a multileader, a label block with attributes, or it may be somewhere in a block of notes. Have I got you thinking yet?
Now, here’s the kicker. During the design phase, that closed feature will change its shape, thus changing its total area. Or maybe it’s in a prototypical drawing and changes for every project it’s used in.
If you’re using a static callout of that area, you’ll need to query the feature whenever it changes and subsequently edit the callout to reflect the new area. Trust me when I tell you that it won’t take very many times doing that to make it get old. This is where an AutoCAD field can come to your rescue.
The Object Is Your Objective
By my count, there are 50 field names available from the Field dialog box, and they fall within seven categories. You can leave the category set to All and choose what you want from the entire list, but most people prefer to find and set their category first, thus paring down the list. Since the enclosed feature in our drawing is an AutoCAD object, choose the Objects category.

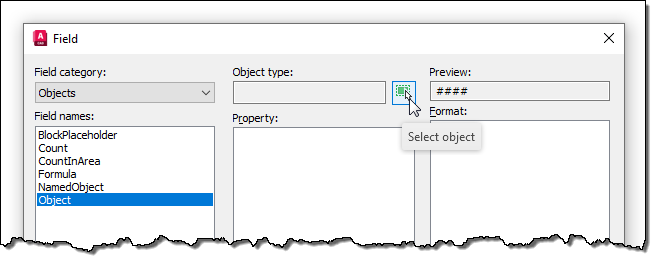
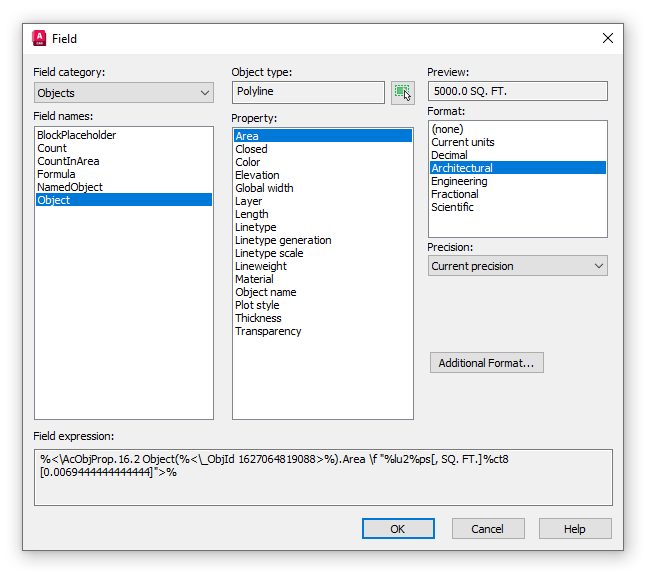
You should now see only the six field names in the category. All are useful in their own way, but we’re after the Object field for this exercise. When selected, the dialog will change to offer other options. Our next step will be to select the closed feature we’re working with, so select the small select icon next to the Object Type box and select the closed feature. The middle property panel will now be populated with all the properties of the polyline available to you.

In this example, we’re labeling the total area of the object we’ve selected, and conveniently, Area is at the top of the list. Select it, and make sure the formatting is what you want from the Format box on the right.
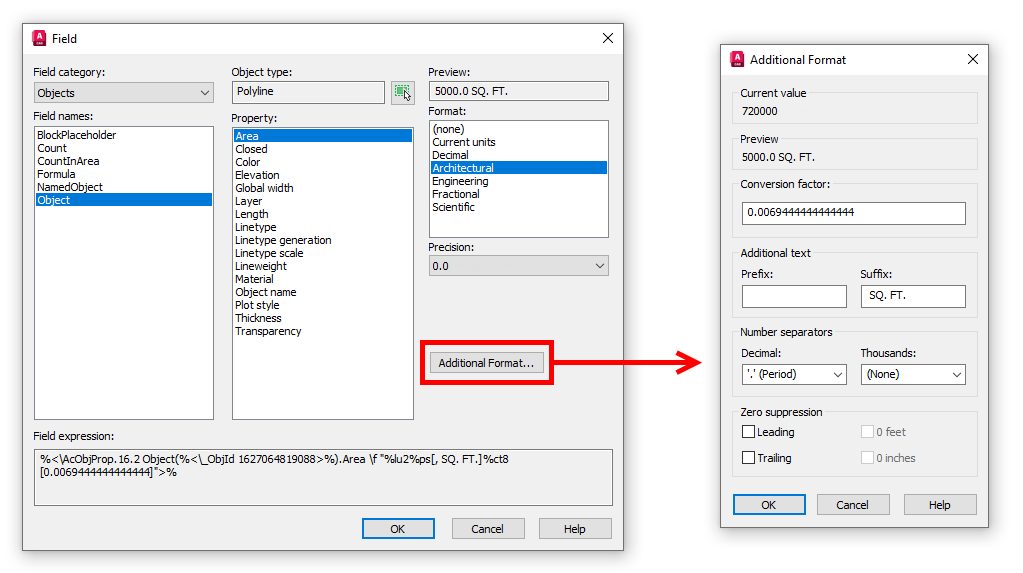
Pro Tip: Need some additional text like a prefix or suffix? Click the Additional Format button for these options and more!

Now, with the proper field applied to the callout of your closed feature, it will update whenever its shape is edited. (Just remember the rules on updating fields. I suggest a quick regen).
Not only does this method cut out the continual querying and editing steps, but it also removes the possibility of typing in the wrong value. We humans are quite prone to mistakes, you know – at least this one is.
My example used the area property of a polyline. It could have been the length of a path through a park or even the name of an Xref. The point is to keep this nugget in mind should you ever have to call out a property of an object. It might just save you a lot of work and keep those pesky typos out of your valuable drawings.
More Tuesday Tips
Check out our whole Tuesday Tips series for ideas on how to make AutoCAD work for you. Do you have any favorite AutoCAD tips? Tell us in the comments!


Add comment
There are no comments